Card Payments
This developer documentation provides everything you need to integrate your Mobile App or Website with the MultiPay Payment Service to take card payments in a secure and complaint way.
Getting Started
MultiPay exposes a modern, REST‑based API surface delivered over HTTPS with TLS v1.2 or higher. All requests must include your issued API Subscription Key in the Ocp-Apim-Subscription-Key header. Request and response bodies are formatted as application/json.
Many MultiPay operations are asynchronous. For these endpoints, you must provide a callback URL so MultiPay can deliver the final event or outcome once processing is completed.
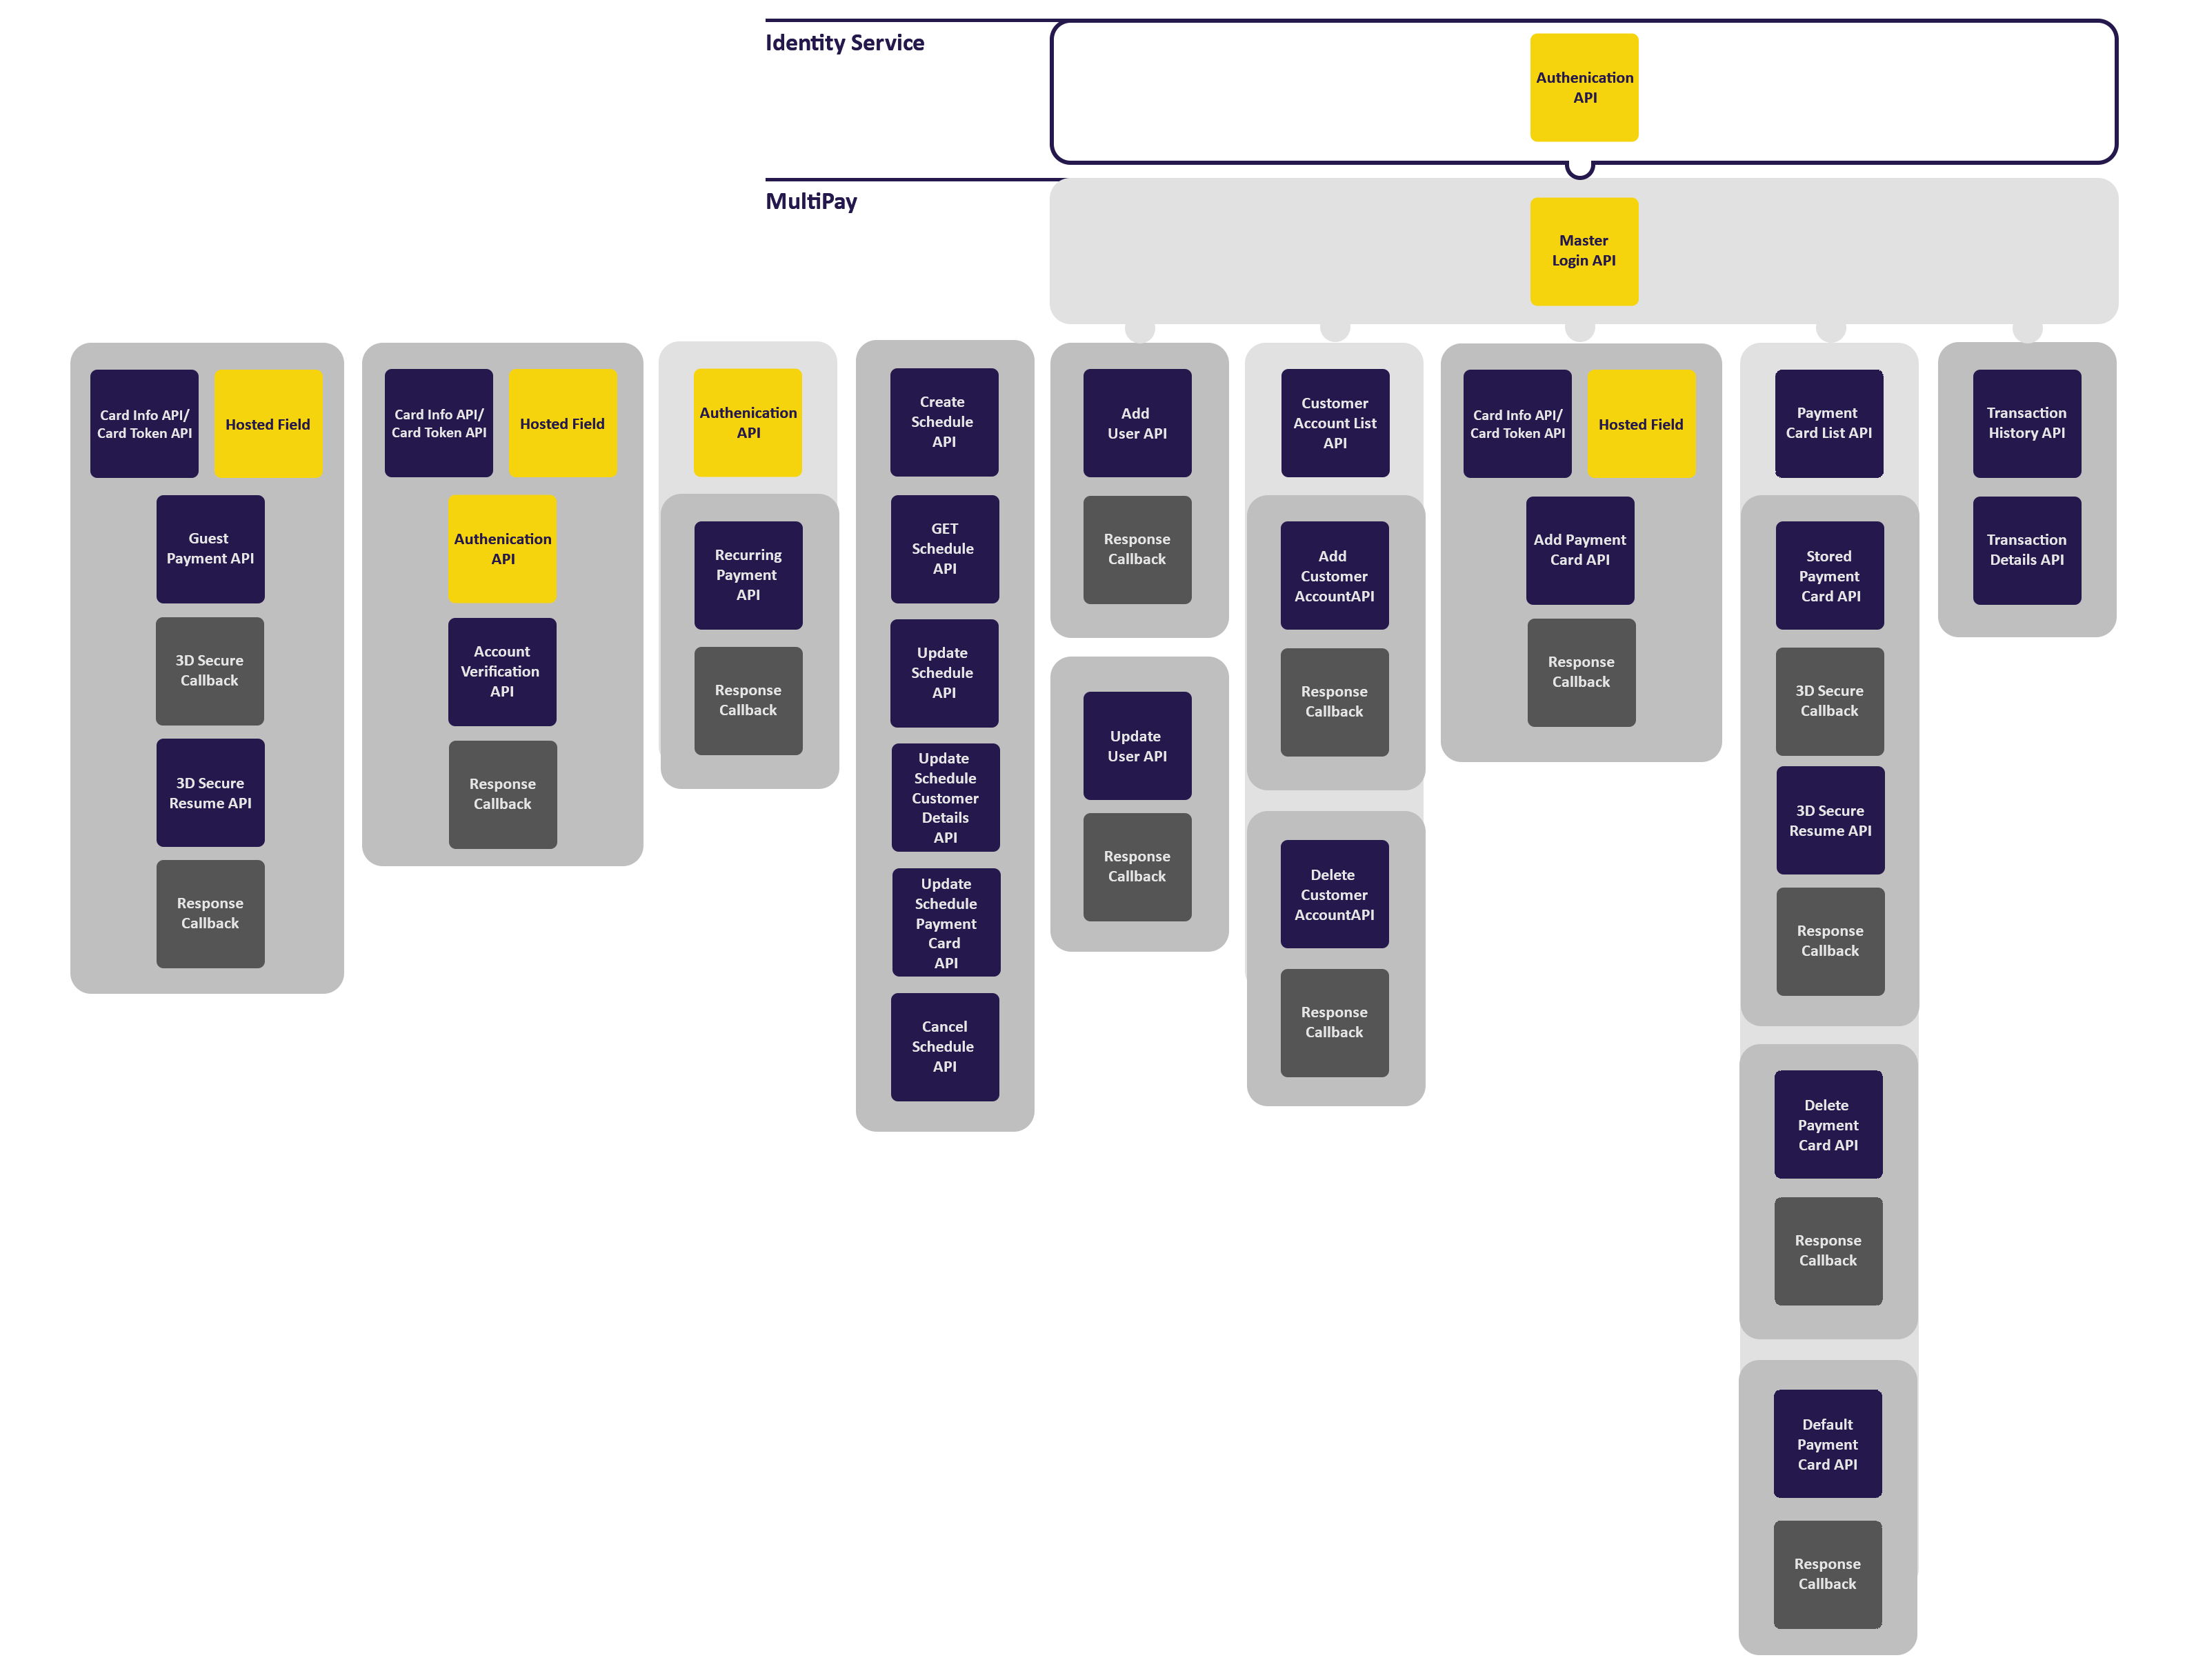
The diagram below shows how each of the MultiPay Card Payments APIs work together to perform the required service, click on the image to enlarge.
Taking a Card Payment
To take a credit/debit card payment, please follow the process outlined below on how to tokenise the card number number and sending the payment details to the MultiPay Payment Service for processing:
PCI DSS Card Tokenisation
To take a card payment we require for the credit/debit card number to be tokenised, thus removing additional demands on becoming PCI DSS compliant. The card token is stored with a limited lifespan for Guest Payment and Add Payment Card Requests.
There are two ways to obtain a card token depending on the application you are integrating our APIs into. If a Native Mobile APP the application is held on the customer's device and therefore allow you to use the following APIs. If your application is a web based i.e. your application sits on a web server then you will need to use our Hosted Field solution removing the requirement for your web application to be certified PCI DSS compliant.
Card Info
The initial CardInfo Request is a POST request containing the cardholder’s PAN. We then perform a BIN lookup and check that it is a valid card before returning synchronously the result of the lookup including details the Card Scheme and Card Type. Only valid cardholder’s PAN will be processed and therefore require tokenisation.
To make a CardInfo Request POST the following Payload to: https://sandbox.multipay.uk/PP.SmartPay.PaymentCard.Api/PaymentCard/CardInfo
{"pan":"9900000000005159"}
Card Token
The CardToken Request is a POST request containing the cardholder’s valid PAN. We then encrypt the cardholder’s PAN and generate a Token which is then synchronously returned as the response of the request.
To make a CardToken Request POST the following Payload to: https://sandbox.multipay.uk/PP.SmartPay.PaymentCard.Api/PaymentCard/CardToken
{"pan":"9900000000005159"}
Important: In order to make a successful POST call to both Card Info and Card Token endpoints you are required to provide the SandBox API User Key called (Ocp-Apim-Subscription-Key) in the request header.
Note: The Production Card Info & Card Token URL reside on an external PCI DSS server therefore are different to the SandBox URLs above.
Hosted Field
The MultiPay Hosted Field solution renders the sensitive Credit/Debit Card Number input field into your website/application using an iframe that is hosted by PayPoint in our PCI DSS compliant zone.
The cardholder simply completes the Card Number (PAN) input field on our server, we then encrypt the cardholder’s PAN and generate a Token which is then returned back to the browser. The Hosted Field solution provides a JavaScript Callback to receive the Card Token along with the Card’s Scheme and Type. The hosted Card Number (PAN) input field can also be easily customised to fit into your payment page design.
For a step by step guide to how to include the Hosted Field to your website's payment page, please refer to Hosted Field.
Guest Payment API
To create a one-time payment (Guest payment) a POST Payment Request is required containing; ClientTransactionRef, Amount, Account Type, Customers Details & Card Detail including the CVV, Expiry Date and the Card Token (as detailed above). The request must also contain the Callback URL allowing for an asynchronous response, meaning that the result of the authorisation is in the Callback and is not in the initial response to the request.
For details on how to make a Guest Payment Request refer to the detailed API Documentation
Resume - 3D Secure
An ecommerce Guest Payment request, requires the cardholder to be authenticated using 3D Secure; for more details on the 3DS process and how to add cardholder authentication to your payment requests, visit 3d Secure.
As part of the 3DS process you will need to make an additional request to resume the transaction with details on the result of the cardholder authentication, for details on how to make a 3DS Resume Request, refer to the detailed: API Documentation
Common Payment Response Codes
SS000 - Payment Successful
ST900 - SmartPay Unavailable - Please try again later
SP100 - Card Declined
SP200 - Declined by Bank
SP201 - Referral to Bank
SP202 - Card reported lost or stolen;
SP203 - The transaction has been blocked
SP204 - Declined Other
ST300 - Invalid content in request
ST301 - Compulsory field not present – cannot continue.
ST108 - Invalid PaRes
SP117 - Card brand is not supported on this account
ST909 - Failure in Vend Activity from Transaction Injector REST
Registering a Customer
To allow customers to make a Stored Payment Card transaction, view their Transaction History and manage both their Payment Cards & Customer Account it is required that the customer is registered. Using a process of Single Sign On (SSO) the following methods allow for the customer to be registered and to be automatically logged into the MultiPay Payment Platform.
As the client you will be provided login access to the Identity Service and are required to authenticate yourself before submitted any Master API calls.
Identity Service - Client Authentication
Before logging in as customer, as the client you will need to logon to the PayPoint identity service by submitting a request containing your username and password. You will then be provided in the response an Authenticated Client Bearer Token which is required to be sent in the following Master API calls:
For details on how to make an Authentication Request to the Identity Service, refer to the detailed API Documentation
Master Add User
If the customer does not exist in the PayPoint Identity Service and MultiPay Payment Platform, you can request to add a new user on both services. To add a customer/user you will need to submit an Master Add User Request containing the Authenticated Clients Bearer Token and the Customer details including: Customer Username (Email Address), First Name, Last Name, Account Type, PRN/PAN, Product Type and Mobile Number.
For details on how to make a Master Add User Request, refer to the detailed API Documentation
Master Login
To login as the customer you will need to submit a Master User Login Request which contains the Authenticated Clients Bearer Token and the Customer Username. You will then be returned a Customer Bearer Token which is required to be sent in the header of the registered customer API including the Stored Card Payment API.
For details on how to make a Master Login Request, refer to the detailed API Documentation
Master Update User
If the customer exists in the PayPoint Identity Service and MultiPay Payment Platform but has the wrong details then you can request to update a user on both services. To update a customer/user you will need to submit an Master Update User Request containing the Customers Bearer Token and the user details that you wish to change: Customer Username (Email Address), First Name, Last Name and Mobile Number.
For details on how to make a Master Update User Request, refer to the detailed API Documentation
Master Update Account Balance
If enabled, you can POST the account balance of a registered customer by submitting an Master Update Account Balance Request. The request will need to contain your Authenticated Clients Bearer Token, and the customer's balance details including: Customer Account Number (PAN), Balance, Debt Balance (optional) and the UTC time of when the balance was taken.
For details on how to make a Master Update Account Balance Request, refer to the detailed API Documentation
Managing a Registered Customer
The following full suite of APIs allow the client manage a registered customer's service accounts (PRN/PAN) as well their credit/debit payment cards in secure and PCI DSS compliant approach.
Adding a Customer Account
To add a new customer account to a register customer you will need to send a Add Customer Account Request containing; the Customer Bearer Token (obtained from the Master User Login described above) and the new Customer Account ID (PRN/PAN). An asynchronous response containing the result of the request is returned.
For details on how to make a Add Customer Account Request, refer to the detailed API Documentation
Customer Account List
To display the customer account(s) (PRN/PAN) allocated to a customer, you will need send a Customer Account List GET Request which contains the Customer's Bearer Token. A synchronous response containing each of the customer accounts (PRN/PAN) and the type of account is returned.
For details on how to make a Customer Account List GET Request, refer to the detailed API Documentation
Delete Customer Account
To delete a customer account you will need to send a Delete Customer Account Request containing; the Customer Bearer Token (obtained from the Master User Login described above) and the Customer Account ID (PRN/PAN). An asynchronous response containing the result of the request is returned.
For details on how to make a Delete Customer Account Request, refer to the detailed API Documentation
Adding a Payment Card
To add a new payment card to the registered customer, you must first get the payment card’s PAN tokenised using the CardToken API or Hosted Field solution described above. When you have a card token you will need to create an Add Payment Request which contains the Card Token, CVV, Expiry Date and the cardholder name. An asynchronous response containing the result of the request and the stored Payment Card Id is returned.
For details on how to make a Add Payment Card Request, refer to the detailed API Documentation
Payment Card List
To create a stored Payment Card Request you must display a list of the stored payment cards and allow the customer to select their preferred card. To display the payment cards that have been stored you will need send a Payment Card List GET Request which contains the Customer Bearer Token. A synchronous response containing the stored Payment Card Id, Card Type and Card Scheme for each card that is returned.
For details on how to make a Payment Card List GET Request, refer to the detailed API Documentation
Delete Payment Card
To delete a Payment Card a Delete Payment Card Request is required containing; the Customer Bearer Token and the stored Payment Card Id. An asynchronous response containing the result of the request is returned.
For details on how to make a Delete Payment Card Request, refer to the detailed API Documentation
Default Payment Card
To default a Payment Card a default Payment Card Request is required containing; the Customer Bearer Token and the stored Payment Card Id. An asynchronous response containing the result of the request is returned.
For details on how to make a Default Payment Card Request, refer to the detailed API Documentation
Taking a Stored Card Payment
When a credit/debit payment card has been secured added to a registered customer, then this card can be used to take a card payment using the following APIs:
Stored Payment Card
To create Payment Request using a card that has been previously stored we will require a POST Payment Request containing; ClientTransactionRef, Amount, Account Type, Customers Details & Card Detail including the CVV, Expiry Date and the stored Payment Card ID. The request must also contain the callback URL allowing for asynchronous response meaning that the result of the authorisation in the call and is not the initial response to the request.
For details on how to make a Stored Payment Card Request, refer to the detailed API Documentation
Resume - 3D Secure
A Stored Payment Card request, requires the cardholder to be authenticated using 3D Secure; for more details on the 3DS process and how to add cardholder authentication to your payment requests, visit 3d Secure.
As part of the 3DS process you will need to make an additional request to resume the transaction with details on the result of the cardholder authentication, for details on how to make a 3DS Resume Request, refer to the detailed: API Documentation
Displaying the registers customer’s transactions
To display in your online portal or App the transactions that a registered customer has made, you will need to request the transaction history and details, using the following GET requests:
Transaction History
To get a list of all the transactions made within a given criteria you will need to send a Transaction History GET Request that contains the Customer's Bearer Token and pagination criteria (page number and page size). A synchronous response is returned which lists each of the transaction within the request criteria and includes the transaction details: transaction id, amounts, service/product and the date of the transaction.
For details on how to make a Transaction History GET Request, refer to the detailed API Documentation
Transaction Details
To receive more details on an individual transaction, send a Transaction Details GET Request that contains the Customer's Bearer Token and the Transaction ID. A synchronous response is returned containing the transaction’s details amount, service/product, transaction date, truncated payment card PAN and Vend Reference UTRN.
For details on how to make a Transaction Details GET Request, refer to the detailed API Documentation
Recurring Payments
Before initiating a recurring scheduled payment from your customer, you will need to obtain Continuous Authority on the customer’s card. This is achieved by sending an API request containing the customer’s card details for Account Verification.
Once you have Continuous Authority you can either send adhoc recurring payments requests using the stored RecurringPaymentCardId, or create a payment schedule where PayPoint will make recurring payments based on the schedules frequency.
Account Verification
Account Verification or Zero Auth sends the only card details for verification and is not authorisation of a payment. Upon a successful verification we will store the Credentials on File and have the Continuous Authority for the credentials to be used in subsequent adhoc or scheduled recurring payments. An asynchronous response containing the result of the request is returned, including a Recurring Payment Card ID for the stored Credentials on File.
For details on how to make an Account Verification request, refer to the detailed API Documentation
Adhoc Recurring Payment
To request a recurring payment from your customer’s Credentials on File, you will need to send a Payment Request containing your Client Bearer Token obtained when authenticated by the identity service (See Identity Service - Authentication below). The request body must contain the RecurringPaymentCardId, amount and type of recurrence (recurring/instalment). You must also include a Callback URL to receive the asynchronous response containing the result of the recurring payment authorisation.
For details on how to make a Recurring Card Payment, refer to the detailed API Documentation
When managing your own payment schedule you will need to conform with card scheme rules regarding the use the Continuous Authority. For more details on card scheme compliance, please visit: Your Website & Payment Scheme Compliance section.
The following APIs allow you to create and manage recurring payment schedules held with PayPoint. PayPoint will then automatically request each payment from the agreed payment schedule.
Create a Recurring Payment Schedule
To create a payment schedule, you will need to send a Create Schedule API Request containing: Amount, CustomerId/PRN/PAN, Customers email, Schedule Type, Schedule interval/Recurrence and Start date.
For details on how to make a Create Schedule Request, refer to the detailed API Documentation
Cancel Schedule
To cancel a schedule, you will need to send a Cancel Schedule Request containing the Schedule Id that you wish to cancel. A synchronous response containing the result of the request is returned and if successful the schedule will be flagged as cancelled.
For details on how to make a Cancel Schedule Request, refer to the detailed API Documentation
GET Schedule
To get a list of all the schedules made within a given criteria you will need to send a GET Schedule. A synchronous response is returned which lists each of the schedule including the details: schedule id, amounts, schedule start date, next payment date and the status of the schedule.
For details on how to make a GET Schedule Request, refer to the detailed API Documentation
Update Schedule Customer Details
To update the customer detail in the payment schedule you will need to send a Update Schedule Customer Details API containing the details of the changes.
For details on how to make a Update Schedule Customer Details Request, refer to the detailed API Documentation
Update Schedule Details
To update the schedule interval, recurrence and amount detail in the payment schedule you will need to send a Update Schedule Details API containing the details of the changes.
For details on how to make a Update Schedule Details Request, refer to the detailed API Documentation
Update Schedule Payment Card
To update the credit/debit card used in the payment schedule you will need to send a Update Schedule Payment Card API containing the new Recurring Card Payment ID.
For details on how to make a Update Schedule Details Request, refer to the detailed API Documentation